Showing posts sorted by relevance for query paint. Sort by date Show all posts

Monday, September 7, 2020

Making things with Paint


 I loved this house.... and it had a blank slate for a basement... concrete floors and cinderblock walls and open beam ceiling...

Nothing done... I used to roller skate around the big basement for exercise... after I got home from work to destress... Then my mind started creating... so I painted the walls white first..and hung some Van Gogh Reproduction Prints on each wall of the basement and visualized... then started creating... with Garage Floor Paint... and Stained Glass...  This was the cafe... I was taking Piano and guitar and this was my Music Dance Studio...


I started with the doorway... LOL.. the previous owner had left this really heavy door against the wall and I couldn't move it.. so I painted around it and that was the start...  As you can see I looked at the cafe painting and copied the doorway... and then I went on to the Pebble floor and stone patio.  Probably, the table that I already had and the door I couldn't move made me decide to do this when I was skating in circles around the basement on the concrete floor... You can imagine.. my mind was creating while I was skating.  This is the same thing I do when I am kayaking and there are not any fish or large turtles or heron to capture my camera focus or my mind focus.... 
Sometimes I feel I am a tortured creative soul, but I am laughing as creating-not wanting to cut my ear off.


I took up Guitar and Piano and Just had a hoot of a time... working hard and playing hard for ten years...


This side was really elaborate... I did the paint first and then the stained glass windows and the walls... then the copper ceiling tiles...and of course, the fab pool table..  pity the phone company man who bet us a game of pool...RFLOL  We won!

When I bought this house the beams were covered with mud from the original building of the house, apparently the owners never used the basement at all... I did enjoy this place for about ten years.... I got my monies worth just out of the creative fun in the basement.

With the help of a fabulous electrician who was helping me with the bathroom you can see to the right.... He suggested I have a mirror ball over my dance floor and it would rotate when I practice my dancing with the pole you see there... LOL... I had two of those poles one on each side of the dance floor and I would swing dance and hustle with the help of jumpropes tied to the poles as arms...

I had the best time dancing.........Jack Vettriano Paintings to dance with me...


'Dance Me to the End of Love'

'The Singing Butler'
They just felt right on the wall in the dark glow of the mirror ball spinning....

And that was just part of the wonderful life I have led, but a Decade ode to the painted basement with the full studio in the back of the basement... for sewing and stained glass...with builtins and a custom exhaust fan for stained glass...This was the basement...

I did use some FABRIC upstairs... and the ceiling of the dance floor was the mirrored fabric of the time.

All of this fabric came from G street ... Notice the chair seats are covered with the same fabric as the draperies...and we carried the look into the kitchen which had an open wall into this family room.

This is where the draperies matched in the kitchen and the kitchen table slipseats were the same fabric  with a white country farmhouse table and dark wood table top

Fun in Every Room for Decorating


Truly the Country Quilters Spare Guest Room, right down to the stenciling on the old wooden chest for the linens and a dry sink on the side


Thursday, August 26, 2021

Quillow-I SPY Concentration with Scraps


Plan the Quillow

For  my Grandson

You can use paint on your laptop to map out your plan and figure yardage

You can put a handle on the quillow or make a separate little tote bag so they can use it as a picnic or play throw anywhere

add a little pillow on the top edge and they can use it as a nappy sack


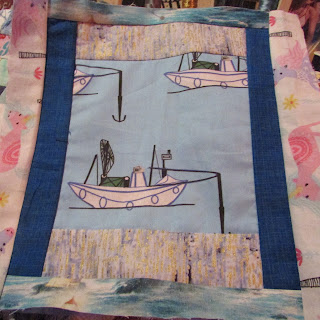
The blocks are 10 inch using scraps

with an item in the center

Put Your small square in the middle and then fill in your block with scrap strips, so you use up all your scraps.

I first cut out all the pairs of small squares and laid them in a pile, and then just grabbed scraps and filled in the blocks after sewing the first small square on.


You could have a theme, Vegetables, Animals,

I am using my scraps from masks-so it is everything

B H or F  whatever your kids call it
Burger and fries block

P
Potato Chip Block


Whale Block-W
Truck Block-T


Kayak Block-K


I have 32 blocks- to I spy- 16 that repeat once somewhere

Each Center picture to have a solid color block cover that has the letter of the name on the front

flap underneath and a number of the sequence it is in on the quilt top.


After putting all the blocks out and figuring where they are going on the quilt- Numbers will be put on the front top of the flap so that you can say--  Number 5    or Number 7 and try to match the squares word items -like concentration....

I spy a  5 .....  matching I spy a  10

Learning Numbers and Letters and words and pictures all on one quilt....  Great quiet time game with themselves too!

You can make bigger quillow and do 52 blocks or more


To figure the yardages for the back- we know we want to match the front size of  92.5 length and 60 wide


We have three pieces that are 1/1/4 yards preshrunk to 40-41 inches wide and we figure the side borders subtract them out and then we know what they take up of 92.5
we need to make the 40 inch preshrunk measure add up to 60 inches... so we add a wide strip of color to the pieces to add up to total 60

we take the length we want subtract the borders and divide by 3 for the size of the pieces

Our front is 92.5 finished-subtract out borders = 85 1/2 divided by 3 = each piece 29 becomes 28 1/2 x 3 = 85 1/2 center only have 27
so add 2 and 2 

So 30 middle 27
bottom 30


The pillow pocket is one third of the measure of  the width
makes a nice 20 x 20 throw pillow and if you add a handle it is a great tote a long blanket throw
Step one  Plan
Step two-to motivate I sew the back together first without the borders..
then
Step Three - Make all the squares and lay them out on the back to see how to make the border frames to fill the size of the front

Step Four - sew the front together to the exact size it will be

Step Five - add the filler strips before the borders on the back to make the matching size to the front before its frame in borders

Step Six Finish the back
Step Seven - do a really cute pillow pocket and handles

Step Eight -Sandwich and plan the freemotion quilting

You can do a smaller quilt  just for play


There are 26 letters in the Alphabet so I wont have all the letters in the alphabet repeat

Pairs of everything so they can play concentration

In my case, I bought quarter yards of bright colored marble blender fabrics for the flap that goes over the I Spy concentration pic

Be back with more pics as I finish Steps

I...decided to quilt the back so I could freemotion differently than the front... so there will be a piece of flat batting on the back with quilting and the blocks will be sewn together with borders on the front.... then I can free motion just in the borders for fun before attaching the front to the back in a sandwich.  Then I will probably machine tie quilt at corners and center of blocks.... we will see what I come up with...


Sometimes people say .."How do you do all these things at once?"   I cut multiples... I have an accuquilt cutter and dies for letters... but in this case I had to make stencils for the numbers.. so it went like this

1.

I had a piece of plain cardboard that came in a package with a description.. lightweight like posterboard.
2.

I had a piece of create-a-pattern leftover from making a pattern from someones dress... if you do not know what this is... it comes double wide but looks sort of like interfacing but wider and just pellon type so it doesn't rip like your pattern tissue and easily folded.  I use it to make patterns, and then put the patterns in marked ziplocks.  There are scraps left over...so here is a case where the scraps came in handy - just like this whole quilt, but the back that was bought.

3.


I searched for a stencil pic on the laptop... made it the size I needed for these quiltblocks-prt sc (print screened) the picture and then pasted onto paint..


cropped it to the stencil piece and laid my create-a-pattern piece onto the screen-used a marker and traced off my laptop screen on paint and then voila... stencils... laid on top of the poster board cardboard and cut around the number... 

4.


lay a stack of fabric of different colors so I would have different colors of each number and cut around multiples.

Now this ISPY will also learn letters and numbers and can play concentration at nap time with themselves or during quiet time with others.

5.

Cutting many at once saves time and you are able to duplicate your projects by have the multiples ready after finishing one project to do a second.

I do the same thing with tops-jackets-and pants,etc.. cut out multiples and they are ready to sew more than one.  

Sunday, January 5, 2020

Leopard and Panther Tote-Shoulder Backpack


I am attempting to make this bag... the pictures of the cat tapestries came from G Street Fabrics... and the black is neoprene... the request is a wide shoulder strap and the two cats one on each side, but I am not sure about the strap attachment, the closure...drawstring with zipper or velcro flap and some type of pockets behind the cats....They emailed me a picture of a bag style and I did this in paint to see how it would look

These are drawings in paint as I try to figure out exactly what materials to use where.
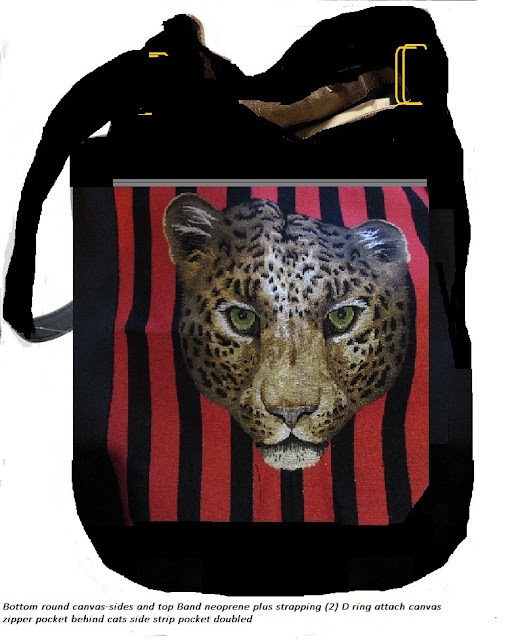


Made side strips with pocket added to panels then put both panels together


Neoprene shortage... will line with something else, but using as a wide strapping and top casing shorts me on the bottom trim.... will figure this out

Sew the bottom trim on...top casing and bottom edge


I will sew the last seam and know the size of the bottom circle piece then lining and strap attachment

This is like a duffle bag... so I am going to put the double bungie pull strings through the top trim and a zipper that has large teeth and the ability to use a strap on the side or on the top  or regular backpack style.  ----> little drawing


Thinking through the strapping... I think I will put Loops on both sides top and bottom and on the inside top above zipper on both sides... Then He can wear as backpack regular or diagonal or carry handle.  Loops Sewn in Seams with 3 strappings that are adjustable


Now the Drawstrings at top-using bungie type narrow elastic and cord locks.


I will post a picture with details after I finish it.

At this point the top enclosure has been sewn in with a zipper closing.   So next the lining.


Originally I made the lining out of vinyl, but checked with the future user and we decided that was too heavy.  So, using the lining previously made as a pattern, made it out of a light pleather, but decided to add a zippered pocket to the inside and a loop to hang a detachable bag in the inside for ??


Strapping in pleather doubled for strength but softness can be inserted 3 ways... as backpack, as a barrel duffle bag style supporting underneath or as an over the shoulder vertical bag


original lining in vinyl to copy for pleather lining

Original neoprene top changed into inside detachable zipper bag

Two Loops inside the Tote to hang this bag from and Extra straps not in use inside the bag...  DONE  DONE DONE and GONE.... Back to sewing the crazy cat quilt and gifts and clothes.....

My blog viewing history.... This month  and since started 7,438


Hong Kong
262

United States
112
China
101
Germany
24
France
13
Russia
10
Canada
5
Ireland
4
India
3
Iran
3