Sunday, March 28, 2021

Faux Leather Sissy Bar Bag

 Well Faux Leather can Be Awesome...Make Your Something Custom for YOU

All the supplies came from www.Gstreetfabrics.com


Regular Sewing Machine with Leather Sewing Needles by Schmetz... number 18 for many layers


To Fit on the back sissy bar of a Harley Motorcycle


Webbing Straps with D Rings

Detachable sling bag strap with neoprene padded shoulder and swivel hooks to attach to side D rings

zippers (3)  2 way on front pocket

large one way on side of bag and medium on inner neoprene suede back lining.


Front pocket 2 way zip for sunglasses/gloves/small

 items--sewn in netting pocket with toggle draw to separate sunglasses and gloves.


At this point the bag itself is 2 layers of faux leather, then inside there is a neoprene lining of entire bag and you are looking at the hand stitching of the arrow tabs and D hooks for the swivel hooks to attach to for the detachable side sling strap.


I had no pattern, just a piece of cardboard outline of the sissy bar that this would be attached to.


I used Coats and Clark Outdoor Exterior thread for all the handwork-UV protected and good for Sails and outdoor canvas work.  I had an awl, and a palm thimble that I used for my experimental shoework.

The palm thimble I have had a while, the awl I got at G Street.  The hand leather needles I got from a universal repair pack of hand needles at G Street Fabrics.


The back straps are webbing we sell all widths and fibers for tote making.  We have parachute clips in black and white 1" and 2".  The swivel hooks I purchased there for the strap.  We have leather, but the fellow purchased faux leather and I doubled it for added stability so I would not have to put any kind of interfacing structure for it to stand up.  I doubled all pieces wrong side together and then sewed the bag pieces together.  Then inside the bag the seams are exposed but I lined it with the neoprene with the suedeback out so when reaching in the bag you are feeling and seeing only suede.


The lining zips shut separate from the outer bag zipper.  I just thought that looked cooler than just a lining.


This is looking in the bag when you first unzip the outer zipper.


I  made two drawstring bags for the inside of the sissybar bag.  


One drawstring netting bag for wetdry clothes, and miscellaneous-(similar to the sewn in netting lining of the front zipper pocket) and one suede drawstring bag for the detachable slingbag style strap with swivel hooks.   All bags having a 2 hole cord lock on their drawstring.  The edging around this whole bag was a foldover trim of the same faux leather handstitched on the entire bag and the arrow heads at the strap hook catches.


I am not saying anything is inexpensive in total....but the cool faux leather we have is only 15.00 a yard... that is a piece 54 by 36 inches for 15.00----------  All the D rings-cordlocks-cording-netting-lining-zippers-swivel hooks-strapping- added to $78.00 for this bag... would have been more with parachute buckles, but exactly custom to fit the sissybar.  You can make your item to meet your special needs and customize whatever way you want... ONE OF A KIND


We have all kinds of faux leather for incredibly awesome things if you want to give it a try.

My first experience with faux leather lined with soft vinyl was my really fun Tote Fabric Bag...


This combines quilting on pocket..tote handles of folded faux leather and a soft faux leather shoulder strap inside attached to D-rings for when it is filled to the top and you need added shoulder support after shopping spree - LOL


You can also combine Faux Leather and Fabric with a Clear Plastic cover as in my fun Laundry Bag... it stands by itself, is lightweight and is great at the laundromat....


and also works for vinyl lined and clear plastic covered fun Beach Bags(just wipe and dump out that sand after the beach)


Combined skins from our skinbin with vinyls fabric and clear plastic...


OR Kayaking Bags

take your lunch and wet dry clothes for your paddling trips


Saturday, March 13, 2021

Baby Shower Gifts

 Seww.... New Grandchild coming...

Making the gifts before HE gets here...

Before I found out he was a boy... I started with Butterfly theme... and then Lambies...

Lots of Minky colors @  www.GstreetFabrics.com


This is a minky(sew washable) changing pad...both sides are minky and quilted through on the diagonal.  The yellow minky is from G street... the butterflies are from my gardens.


Sewww...


This is a cuddle snuggy minky Lambie Pie baby mat.  Not Easy, but sewwwwwwwwwwwwww    soft!

Many Bibs and burpers....

Minky and Fabric on Bibs from www.Gstreetfabric.com


unfortunately, forgot to take pictures.... of the Bee themed collection changing pad with the beehive in the middle padded and pockets to put things in... It folded and velcroed shut.

The fabric matched these bibs and Burpers that were backed with terrycloth for extra burpability.

These bibs shut with velcro tabs.  Buttons are just to be cutsy.  The frogs are from the leftover minky and I used ultra hold heatnbond to  apply them to the bibs.

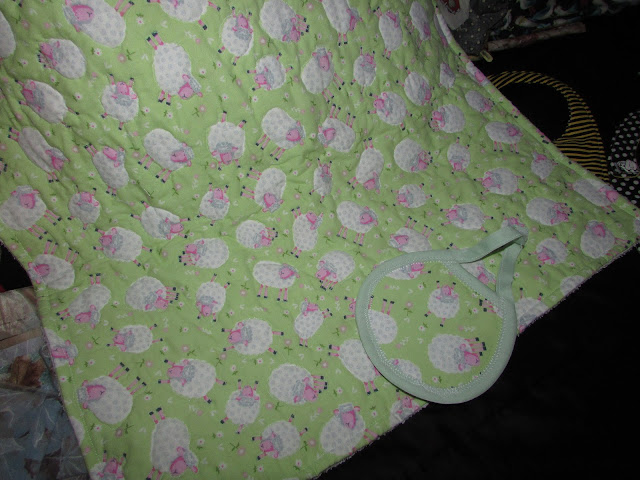
Continuing the Lambie Theme with the pretty green lamb cotton we have in the quilting section $8.77 sale  table at G street fabrics- I backed this fabric with terry and one layer of flat batting and quilted just the lambs...   www.Gstreetfabrics.com


Some of the burpers in this set were backed with terry, some with the pale green minky we carry.  I made a bunting out of the pale green minky...

Terrycloth for Burper Bib and Changing pads Backs in many colors at www.Gstreetfabrics.com

I stopped to put some of these things on here, before I forget.

I am currently doing a mask order for someone, and have 3 toboggans here that need the theme put on them... I usually either cross-stitch something on the center of the hat, or apply an applique..

I have 2 onesies that are in process and one of them is going to have butterfly wings on the back of it...  I will take picture when I have finished it and this order I am supposed to be doing...

I have to go to work AM, so I need to stop fooling around here... but just wanted to show you guys that I am still sewing away everyday.


Thursday, February 18, 2021

Sew a Quillow for your Car!


People in your backseat may get cold-keep a Quillow in your car


What is a Quillow?  Quilt that folds into a pillow

Go to :  


Blanket that folds into a pillow-BILLOW


Wednesday, February 3, 2021

Turtlenecks and Cardigans


I am doing a lot of things at once... BUT... I decided to blog about these turtlenecks I love.

I was cold  this week and I wandered into 'The Treasure Hunt Room'.  I work at G Street Fabrics-have a little Etsy store and make all my clothes.  I found 4 sweater style knits and just bought whatever yardage there was.  For a Turtleneck you really only need your body of your sweater length and the sleeve length. (1 1/2 yds)  that is 27 inches and 27 inches on a 60 inch wide knit for my sweater. There is usually enough to make whatever type of turtleneck you want unless it is really slouchy.


Our store is in Rockville, Md and if you have never experienced it, you must come some time if possible.  It is a big warehouse, with every kind of fabric casual knits to fancy dresswear and a Home Decorating Department where we do Custom Upholstery and Draperies and just about anything you want to ask for.  But, just looking at the fabric choices is a fabulous adventure.  DIYers are welcome.

I don't always use patterns, but I love to take things and mix and match like the body of one and the collar of another.  Exchange sleeves or necklines.

My three favorite Turtleneck patterns are vintage of course, but turtlenecks never go out of style.  And if they are not in a current pattern book, then you can probably find it on Etsy or Ebay or Pattern Review.


Butterick 6248 has a slouchy neck but the pockets are fun.

I love to put pockets in the garment.  You never know when you might want to walk the catwalk.  Come walk our ramp and announce if you made something from our fabric and are showing off.  We will be thrilled.

The Fuschia turtleneck in the blog before this one was one of the fabrics I found in the Treasure Hunt room.  I used the simple and fast pattern KWIK SEW K4069

It is Just a front and a back cut on the fold  and a sleeve piece cut 2
A one piece for the turtleneck that you just fold over and sew on the edge of the neck.  Once you cut it out you can sew it almost as fast as I can write about it, maybe faster.


I purposely make my clothes a little loose fitting, because I am rather shapely and I don't need enhancing.  I did turn the ends of the sleeves up on this and top stitched them as a small hem.  The bottom of the sweater I stitched twice.  I do not have a cover stitch machine, but I turned the hem up and top stitched and then stitched close to the folded up hem.-to give the effect of a cover stitch.  


It is not easy to see in the picture, but I thought it was a nice effect on this sweater.

Sometimes I don't do any hem at all because it is a sweaterknit that doesn't ravel.
Now as you see in this cardigan, which was made from left over scraps, I didn't really have a choice.  I made a small folded over trim down the front and I doubled the scraps over like the turtleneck piece itself and added it onto the sleeves..  The piece I added on the front as trim, I just did a seam folded it over to the front and topstitched on both edges.   Also on the bottom of the cardigan.

To make the cardigan, I used the jacket top basic pieces from this pattern McCalls Pattern 7076

Remember I was using leftover scraps, so I used the full back piece on the fold and then had to add on the the front pieces and the rib of the scraps went in the horizontal instead of the vertical direction


small handsewn snaps on the underside of the edges where you might want to attach fur trim

Doubled over scraps sewn onto the cardigan sleeves and banding on the front edges of the cardigan and bottom.... all from scrap pieces


Fur trim sewn in a circle folded over an elastic circle to slide over the cuff for trim that fits but is not truly attached.


Pants are my usual tubins.. wide enough to fit over boots, made like leggings but tube legs to look more professional, or in my case - more flattering than skin tight.


This is my favorite cowl neckline on a turtleneck.

Combo of this collar with the front with the pockets  would be one I would like best.


Tuesday, February 2, 2021

Madly Sewing Up My Stash

Many of my fabrics come from where I work part-time

Gstreetfabrics.com


Or 

Kittyscatscratches.com

Where I have fabric I have designed and many of my pillow fronts come from one or the other of these two sites... both have online selling of fabrics


the things that you can have made with my fabric designs

www.kittyscustomdesigns.com

The new wildlife series of pillows that I have made for sale will be on my Shop at


www.kittyscustomoutfits.com


 Looking at all the Scraps and Left Overs


Left Overs from pillow Back-- fur trim for detachable collar trim- clutch trim fun-Fur earrings


enough from this minky pillow back to make pockets on the end of my minky scarf to keep my hands warm when I am driving and walking to and from the car.


I just made 4 Turtleneck Tops because I was chilly at work.


Extras.. Removable cowel collar infinity scarves-earrings of course-braided bracelets and necklaces-if big enough pieces-cardigans-1.5 yds - on a turtleneck there is usually a big enough piece to do a removable cowel collar or infinity scarf from a side piece-always enough scraps for earrings and straight scarves or braided necklaces.


from the jacket there were little suede and skin and sherpa scraps good enough to crazy quilt a clutch and put pleather wrap pockets on the front of the clutch for cc case and phone case.


Always if there is enough scraps when you cut out a cardigan, you might want to add pockets in the side seams.


I managed to make cardigan to go with turtleneck and used scraps to make banding on sleeves and bottom of cardigan... narrow banding down the front  and then the fur trim I attached to a piece of black twill tape (1/2 inch wide).... folded the 2 inch strip of fur over and stitched to twill tape and added small handsewn snaps so I could attach by putting the small snaps on the under side of the cardigan banding and use the cardigan with our without fur strips..... but the feather fur is so soft I love it.   The cuff banding is just a circle of fur with a piece of elastic inside so I can just slide over the cuff to trim sleeve.